It is obvious that everyone is familiar with blogs and Blogger is a product of Google Inc. and how popular the CMS (Content Management System) is among the Bloggers. There is a myth among Bloggers that Blogger blog is SEO friendly as it is owned by Google itself. But, the fact is that no CMS is SEO friendly by default. As a user we should optimize it for search engines. Google has added some useful SEO features to the Blogger platform and those include - Custom Robots.txt, Search Description for all Blogger Posts, an option to 301 redirect blogger posts, custom permalinks, custom 404 page and much more. I assume that you're familiar with these features but if you're not then Google it. I'm not explaining these features because this post is only regarding the steps which will make your blog SEO friendly. Your blog must be SEO friendly because now a days there are thousands of website and your blog will not be in the search engine or it'll be in the last pages. People usually browse and see only first 3 to 5 pages of the search. Here are few steps which will help you to make your blog SEO friendly.

Title Tag Optimization
If you’re using any default blogger templates, you might’ve noticed that your homepage title appears after every post title in search results. Since Google displays only the first 66 characters of your title, your actual title that come after your home page title will get ignored most of the time. If you’ve targeted any important keywords in your post title, then they’ll be chopped off because of the home page title being appended before it.
In order to optimize your Title tags, follow the below steps.
- Blogger > Template > Edit HTML
- Search for the below code in the <head> section of your template
<title><data:blog.pageTitle/></title>
- Replace it with the below code
<b:if cond=’data:blog.pageType == "item"’>
<title><data:blog.pageName/> | <data:blog.title/></title>
<b:else/>
<title><data:blog.pageTitle/></title>
</b:if>
- Now, save your template.
Change your Post title Heading Tag
By default, all blogger templates use H1 for homepage title, H2 for blog description and H3 to post titles. Due to the fact that the post titles are the second most important part of your blog after the main title, you should assign them an H2 instead of H3.
- Go to Template | Edit HTML
- Search for .post h3 and replace all the occurrences of it with .post h2.
- Next search for,
<h3><data:title/></h3>
- Replace it with the below code
<h2><data:title/></h2>
- Save template.
Meta Description
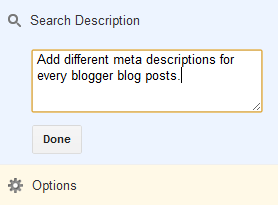
Blogger has implemented another much-awaited feature called ‘Search Description’. This allows us to provide a meta description to every post individually. If you’re using the default template provided by Blogger, you can simply activate this feature by going to Settings > Search Preferences and provide the description for your homepage under ‘Meta Tags’ section. Doing so will enable ‘Search Description’ option for all individual posts & you can see it on the right sidebar while you are on the post editor.

In case you’re using a custom or third-party templates, along with the above settings, you’ll also need to add a small piece of code in your template.
Add the below code under the <head> tag in your template.
<b:if cond=’data:blog.metaDescription != ""’>
<meta expr:content=’data:blog.metaDescription’ name=’description’/>
</b:if>
Robots.txt Settings for Blogger
The robots.txt file in Blogger will have the default settings which are not sufficient enough to control the search engines actions. By default, all your posts and labels will get indexed by the search engines like Google & Bing, thus creating a lot of duplicate content issues inside your own blog. In order to avoid such technical issues, it’s wise to make a better use of the robots.txt file.
Settings > Search Preference > Enable ‘Custom robots.txt’ under ‘Crawlers and indexing’ section and use the below text.
User-agent: Mediapartners-Google
Disallow:
User-agent: *
Disallow: /search/
Disallow: /search?
Disallow: /search?q=*
Disallow: /*?updated-max=*
Disallow: /p/about.html
Disallow: /p/privacy.html
Allow: /
Sitemap: http://www.9to5blogger.com/atom.xml?redirect=false&start-index=1&max-results=500
Points to Remember
- Replace my domain name with yours in the sitemap section.
- If you’ve more than 500 posts, then simply use this tool to generate the Sitemaps based on your post count.
- You can also chose to disallow your privacy and about pages from being indexed. Make sure you change the my URLs with your own permalinks before saving.
Add NoFollow Tag to All Labels
Although you’ve disallowed indexing of Labels using the robots.txt file, it is better to add a nofollow tag to them so that there will be no chance for them to get indexed. Go to Template > Edit HTML and search for the below code.
<a expr:href=’data:label.url’ rel=’tag’>
Either add the nofollow tag to the end of the above syntax or simply replace it with the below one.
<a expr:href=’data:label.url’ rel=’tag,nofollow’>
Save your template.
Custom Robots Header Tags
These robots tags will go in the header section of your blog. You can use these settings to disable indexing of archive and search pages in search results. Go to Settings > Search Preferences > ‘Enable custom robots header tags?’ under the ‘Crawlers and indexing’ section. Next, use the below settings.

In case you don’t understand the meaning and use of these commands, then know about them
here.
Submit Blogger Sitemap to Google & Bing
Although Google & Bing can find your blog, they cannot index your entire site as they won’t have a clue what pages are listed on your blog. This is why the Sitemaps existed. Generate sitemap for your blogger blog (use this
tool) and then submit them to both
Google Webmaster Tools &
Bing Webmasters. Doing so will not only helps the search engines to crawl your blog efficiently but also let you to monitor your SEO score using their dashboard.
Note: You’ll need to place their tag on your site under <head> tag in order to verify your ownership.
Optimize URL Parameters in Webmaster Tools
URL parameters help the search engines to crawl your site even more efficiently. Prioritize your most useful content by controlling the URL parameters that effect your site content. Simply, go to WMT > Configuration > URL parameters and the add the below parameters one by one. Watch the screenshot in case of any doubts.
- utm_source > No > Let Googlebot decide
- utm_medium > No > Let Googlebot decide
- utm_campaign > No > Let Googlebot decide
- updated-max > Yes > Sorts > Let Googlebot decide
- showComment > No > Let Google bot decide
- max-results > Yes > Sorts > Let Google bot decide
- m > Yes > Paginates > Let Google bot decide
- commentPage > Yes > Paginates > Every URL

Redirect Broken Links
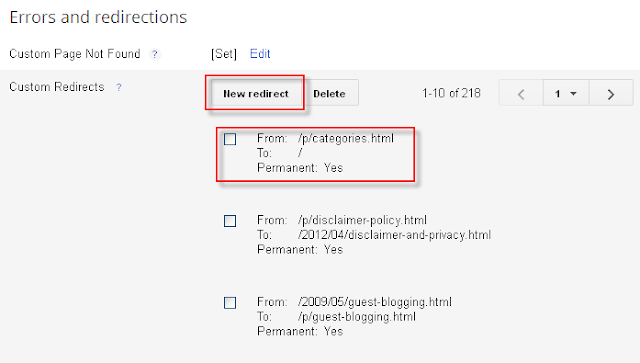
Just go to your webmaster tools account and from Health > Crawl Errors, find out if there are any 404 errors on your blog. If there are any such errors, simply use a 301 to redirect them to the correct locations on your blog.
Go to Settings > Errors and redirections > Custom Redirects.
Apart from these basic settings, make sure you’re optimizing your blog post too. Here are some tips from my end.
How to Write a Keyword Efficient Blog Post?
- Analyze first & choose a target keyword before writing any article.
- Use the exact keyword at least twice in the article & use the synonyms (3 to 5 times) across the entire article.
- Ensure that the permalink of your post contains the exact keyword.
- The title should contain your exact match keyword.
- Make sure your ‘Search Description’ contains at least 1 exact keyword & 1 synonym.
- Lastly, give some useful insights in the article and then publish it.
My Advice: Never stuff more than the described keyword count as it looks like stuffing keywords in your article. Just use them at appropriate places (wherever suitable).
That’s all from me! Do follow these tips to make your Blogger blog SEO friendly. Don't forget to share it on social media for the help of other bloggers. :)


 06:53
06:53
 Unknown


